USB and Wi-Fi
Start with USB pairing and a first backup. After preparing wireless connectivity, back up over your home network.
Connection guide →OPEN SOURCE · SELF-HOSTED · YOUR STORAGE
Manage USB and Wi-Fi backups from a browser. Set a schedule, manage backup encryption, and keep your data on storage you control.
Runs on Linux / NAS with Docker · No project account required
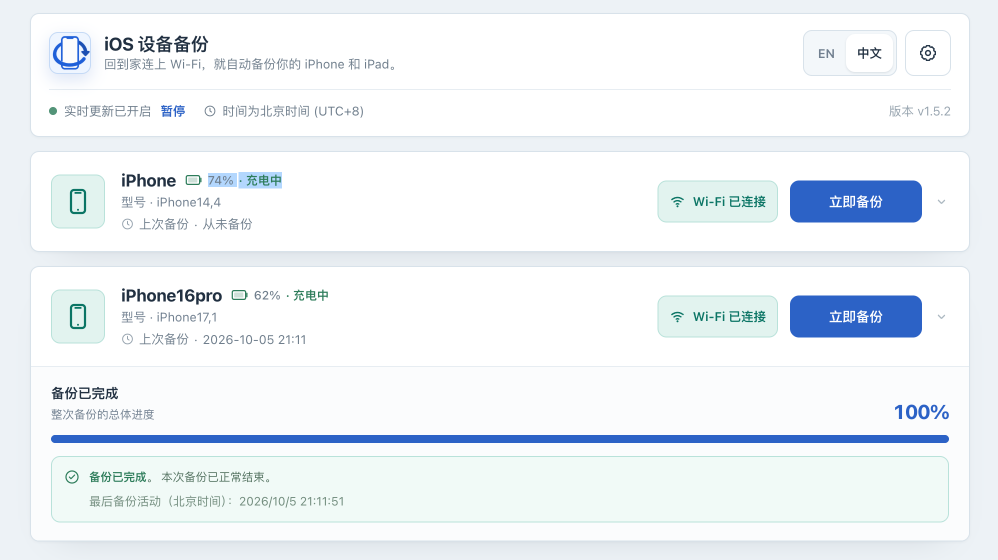
Real interface from the public tutorial · Captured on v1.5.2, Chinese UI · Backup completion does not verify restoration
EVERYDAY BACKUP
Connect your device, choose your conditions, and see the result from one local console.
Start with USB pairing and a first backup. After preparing wireless connectivity, back up over your home network.
Connection guide →Choose a time window, interval, battery threshold, and charging requirement for each device.
Set a schedule →Manage backup encryption and passwords. Keep a separate, secure copy of the credentials you need for recovery.
Encryption and passwords →Follow progress and the final result. See when a device needs permission or a connection needs attention.
Understand job states →Read backup metadata and file inventories, and export CSV lists. Inspection, extraction, and device restore have distinct scopes.
See inspection capabilities →Configure a notification channel for backup results. Test delivery first, then check a real event.
Configure notifications →YOUR FIRST BACKUP
Choose the Synology or Linux guide. Set up persistent storage and start the container.
Synology → · Linux →Connect a USB data cable and follow the permission prompts on your iPhone or iPad.
Your first USB backup →Complete your first USB backup and check the result before setting up Wi-Fi and schedules.
Understand your restore options →Automatic backups start when conditions are met. iOS may still require the passcode. A completed backup is not proof of a successful restore.
BEFORE YOU INSTALL
iOS Backup runs on a trusted host you manage. You choose the storage location and manage device connectivity and access.
WHEN YOU NEED YOUR DATA BACK
Start with which backup to keep, what the target device needs, and which restore paths still need verification.
COMMON QUESTIONS
Device backups are written to storage you configure. The local app has no telemetry or remote frontend assets. Configured notification channels make their own outbound requests.
The supported deployment is a Linux / NAS Docker container. Windows and macOS can access the browser interface; native device backup operation is outside the current support boundary.
The current backup set is updated incrementally. Keep consistent independent copies or NAS snapshots if you need older states. After accidental deletion, protect the existing backup before running more backups.
The guide prioritizes Finder and Apple Devices. Compatibility with this project’s backups still needs device testing. In-app restore is experimental and disabled by default; see the guide for its scope.
Pick the guide for your host and follow it one step at a time.