
Goal and prerequisites
Section titled “Goal and prerequisites”After these steps, you can sign in, locate the three data directories and the password and key files, and continue with USB pairing. This page is for a fresh Linux Docker Compose deployment . Existing instances should use upgrade or instance recovery; Synology has a separate guide.
Prepare Docker Engine, the Compose plugin, and sufficient protected local storage. Diagnostic commands below also use curl on the host. Your account needs Docker access. The default installation uses the supplied Compose file; Git, OpenSSL, and pregenerated keys are unnecessary.
1. Save Compose and confirm the deployment location
Section titled “1. Save Compose and confirm the deployment location”Download the compose.yaml that accompanies your selected image into a new $HOME/iosbackup-deploy directory, or another new directory on your chosen disk. Run subsequent commands in that actual directory. Do not treat an existing data directory as a fresh instance.
cd "$HOME/iosbackup-deploy"docker versiondocker compose versionls -ld /dev/bus/usb /run/udevdf -h .df -i .docker compose config --quietAllow room for a complete device backup and additional headroom. config --quiet validates Compose syntax. Do not share full docker compose config output: advanced settings may expand secrets. If the image is missing, access is denied, or its architecture does not match, confirm the source with the maintainer rather than substituting an unfamiliar image.
| Setting | Requirement |
|---|---|
| Three writable mounts | ./data/backups:/backups, ./data/configs:/configs, ./data/lockdown:/var/lib/lockdown |
| Device mounts | /dev/bus/usb:/dev/bus/usb and /run/udev:/run/udev:ro; source paths must exist |
| Temporary directories | /tmp and /var/run use tmpfs; persistent data belongs in the three data volumes above |
| Privileges and network | Retain the supplied privileged: true and network_mode: host; do not add ports |
| Administrator authentication | Keep IOSBK_AUTH_ENABLED=true; password-file and master-key variables need no default values |
| Port | Compose defaults to 9000; the process without Compose defaults to 8080 |
The default listens on all host interfaces. Check that the port is free and restrict firewall sources. Prefer an HTTPS reverse proxy or protected tunnel across hosts. Do not forward the port publicly or disable authentication. See advanced configuration for custom ports, directories, and credentials.
2. Start and save the initial password
Section titled “2. Start and save the initial password”Run in the deployment directory on the Linux host :
docker compose up -ddocker compose psdocker compose logs iosbackupWith no existing credentials or explicit password configuration, the app generates a random administrator password in data/configs/admin_password and stores its digest in auth_credentials.json. The password appears in the startup log only when generated. Only when no supplied or stored key exists and secrets.enc is absent does the app create data/configs/secret_key; this master key is never logged. Restarts, upgrades, and container recreation reuse these files.
The app sets its dedicated configuration directory to 0700; newly generated secret files use 0600. The default container user is root, so reading the files on the host usually requires sudo. Check host/NAS permissions for data/backups and data/lockdown separately; do not assume those directories become owner-only automatically. Protect the whole deployment directory and its backups.

3. Sign in and verify the instance
Section titled “3. Sign in and verify the instance”- Browser: open your protected address. A temporary trusted-LAN example is
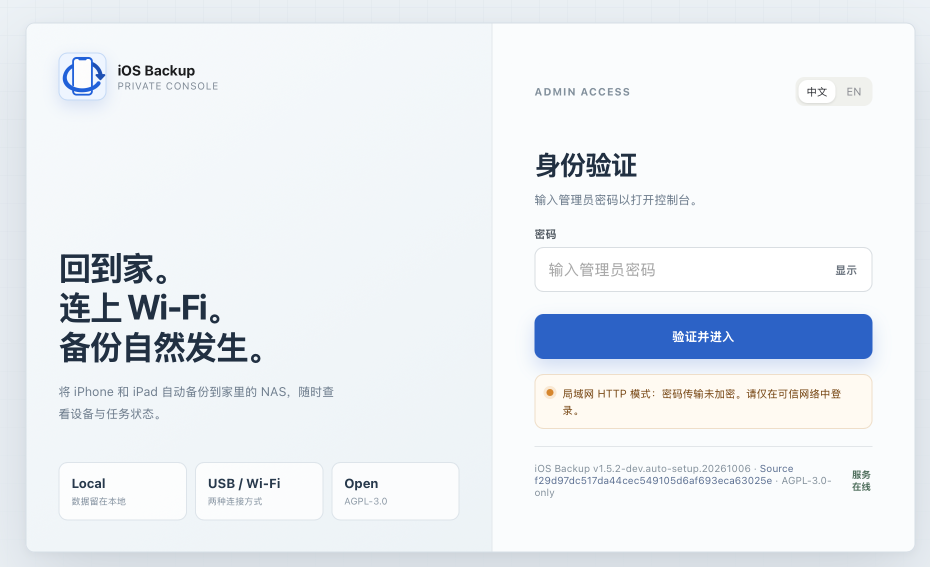
http://<host-address>:9000/; HTTP does not encrypt passwords. - Enter the administrator password from the first-start log and click Verify and continue . The Web form takes only a password; the API Basic Auth username is always
iosbackup. - Check the displayed version, open the first-use wizard , choose Skip for now, use USB only , and continue to USB pairing and the first backup.
Cold startup may take tens of seconds. For diagnostics, run these commands on the host: the first retries the connection within a time limit, and the second checks the version:
curl -fsS --retry 12 --retry-connrefused --retry-delay 5 --retry-max-time 90 http://127.0.0.1:9000/healthzcurl --fail --user iosbackup http://127.0.0.1:9000/api/versionThe second command prompts for the password instead of putting it on the command line. Record version, commit, and build_date. /healthz checks HTTP responsiveness, not USB, disk space, or backup success. Browser sessions last 12 hours and live in memory; restart requires signing in again. Use Sign out from the menu to exit.
Retrieve or change the administrator password
Section titled “Retrieve or change the administrator password”If you can no longer find the first-start log, read the default file from a protected Linux host terminal in the deployment directory :
sudo cat data/configs/admin_passwordDo not put the output in Issues, screenshots, or shared terminal transcripts. The scratch-based image contains no shell or cat, so do not run this inside the container. An explicitly configured instance uses its selected password file.
To change the administrator password, create a separate custom password file using advanced credential configuration, explicitly set IOSBK_ADMIN_PASSWORD_FILE, and recreate the container. Preserve the existing default password and digest. Editing default admin_password alone causes a digest mismatch and startup refusal. Do not delete /configs, change the master key, or change the device backup password to repair login.
Failure paths
Section titled “Failure paths”| Symptom | Check and next step |
|---|---|
| Container repeatedly exits | Read the log in the deployment directory and check the reported password, key, path, or port. If a setting you supplied is invalid, the app will not use a default value to continue; fix the specific error. |
secrets.enc exists but its key is missing or decryption fails |
Restore matching secret_key or the original external key. No replacement key is generated. See instance recovery. |
| Default password and authentication digest disagree | Restore matching default files or use an explicit custom password file; do not delete the digest as an experiment. |
| Page cannot be opened | Test /healthz on the host first, then client networking, firewall, port, and proxy. A host-side failure calls for checking logs. |
| Incorrect username/password | Confirm that you opened the right instance and check the password file it uses; do not enter the phone passcode or backup password. Restart after changing a custom file. |
permission denied / read-only file system |
Check actual bind-mount paths, writability, and NAS ACLs. |
| Initialization reports unsupported hard links | The configuration directory needs a local filesystem supporting hard links; see configuration. The app does not fall back to an unsafe write method. |
| mux-service port conflict | Identify host mux services or other host-network instances and active jobs before arranging a maintenance change. |
Installation is complete once you can sign in, confirm the version and data directories, and pass the host health check. Phone backup has not been tested at this point. Continue to the first USB backup, then arrange a complete instance backup.