Goal and requirements
Section titled “Goal and requirements”Remove unused devices from the console, re-add them when needed, and manage save locations and capacity correctly. Restore to device list on this page restores management state only; it does not write a backup onto the phone.
Distinguish these three operations first:
| Operation | Effect | What remains |
|---|---|---|
| Remove device | Hides it and blocks future manual and automatic jobs; it cannot interrupt a running job | Local backups, device configuration, saved passwords, and pairing records |
| Restore to device list | Shows the device again; a preserved automatic schedule can trigger on a later check | Existing data and settings |
| Delete backup | Experimental; permanently deletes this device’s entire backup directory at the current save location and resets its last backup time | Data on the device, device configuration, and pairing records; this does not remove the device from management |
Device restore is a separate Experimental operation that changes phone data. Do not confuse it with restoring the device list because of the similar name.
Before you begin
Section titled “Before you begin”Check the device name, connection type, and save location. Wait for backup, pairing, checks, encryption, unpacking, restore, or other device operations to finish. Back up the instance if you need to preserve its current state for later recovery.
If you want automatic scheduling to stay paused after you re-add the device, first open Backup settings , turn Automatic backup off, and select Save settings . Removing a device preserves the original settings; it does not turn that switch off.
Remove an unused device
Section titled “Remove an unused device”- In the Web UI , find the target device, confirm it has no active job, and open Remove device .
- Read the explanation and select Remove device… .
- In the confirmation dialog, check the target and effects. Select Remove from console when you intend to hide it.
- Wait for the success message and home-page update. The device should disappear from the active list and should not automatically reappear in the list even if it remains on the same network.
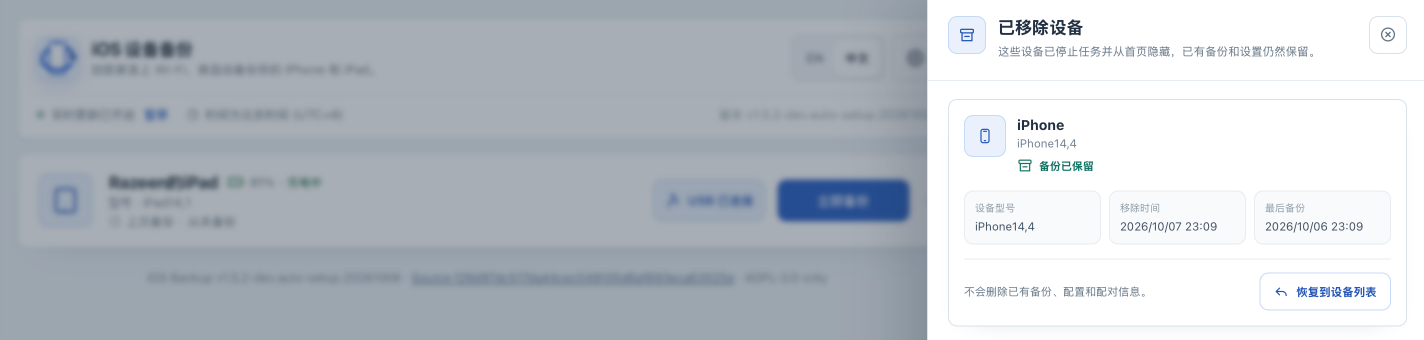
- Open Removed devices in the upper-right gear menu and confirm the device is listed there. Its existing backups remain on disk; this operation does not free backup space.
If the device is busy, wait for its operation to finish. Do not delete configuration or restart the service to force removal. Cancel in the confirmation dialog cancels this removal confirmation only; it does not cancel a backup.
Restore a device to the list
Section titled “Restore a device to the list”- In the Web UI , open the upper-right gear menu and select Removed devices . Check the target name, removal time, and last backup record.
- If automatic backup was previously enabled and you want to review settings first, keep the device offline. Re-adding a device does not clear its old schedule.
- Select Restore to device list for the device and wait for success.
- Return to the home page and inspect its card. It may initially show offline until a later device check updates its connection state; re-adding the device does not itself establish a USB or Wi-Fi connection.
- Open Backup settings , review and save the desired automatic switch and path, then reconnect the device. Before using it again, confirm online state, pairing, and backup reading.
Identify where backups are actually stored
Section titled “Identify where backups are actually stored”Official Compose uses these mappings. The left column is relative to the host deployment directory; the right column is the path visible inside the container.
| Host location | Container location | Purpose |
|---|---|---|
./data/backups |
/backups |
Device backups and optional unpacked files |
./data/configs |
/configs |
Device settings, authentication state, and encrypted secrets |
./data/lockdown |
/var/lib/lockdown |
Device pairing records |
The device’s Save location takes a container path . Its default is /backups; the device backup is normally under /backups/<UDID>, where <UDID> is a placeholder for that device’s identifier. The current version incrementally updates that backup set. It does not automatically create a separately recoverable historical version for every job.
Preserving a particular state requires a separate consistent copy or volume snapshot; see Instance backup. The last success timestamp and job records are not substitutes for such a copy.
Set a location for a device that has not been backed up yet
Section titled “Set a location for a device that has not been backed up yet”- On the host , confirm the target storage is persistently mounted into the container through Compose, writable, and large enough. With the official configuration, choose a subdirectory under
/backups, such as/backups/family. - In Web UI → Backup settings , keep automatic backup off, enter Save location , and select Check beside it. This can create the destination directory and a temporary write-test file. It does not validate space for a full device backup.
- When the location is reported usable, select Save settings and wait for success. The default deployment accepts only
/backupsor its descendants; a custom deployment usesIOSBK_BACKUPS_DIRas the root. Another mount can pass the check but still be rejected when saving. - Reopen settings to verify the persisted path, then complete a manual USB backup and inspect its result.
The expected result is a saved configuration and an actual device backup under the device subdirectory of that location. A successful location check does not mean settings were saved or that sufficient backup capacity exists.
Changing the save location does not move an existing backup. The old directory continues to consume space, the new location may have no set to update incrementally, and the card’s last success time may still refer to the old location. Do not consider a single field change a completed migration. Disable automatic jobs, protect the instance, then plan copying, mounts, and reading checks using Instance migration and recovery.
Check capacity and retain copies
Section titled “Check capacity and retain copies”-
In the host deployment directory , inspect the actual backup volume. With the official relative paths, run:
Terminal window df -h ./data/backupsdf -i ./data/backupsdu -sh ./data/backups -
Check available bytes and inodes, not just the application’s backup-size display. For custom mounts, replace the path with the real host backup location. Inode reporting is not applicable to every filesystem; also use its management tools where needed.
-
Leave capacity for a full device backup, updates to existing sets, and additional copies. Experimental unpacking creates a second set of files;
_unback_sits inside the device backup directory and consumes the same volume’s space. -
If space is low, pause future automatic backups and arrange expansion or cleanup after protecting the data. Do not delete your only known usable copy. Do not rely on
IOSBK_MIN_FREE_BYTESto prevent exhaustion: that parameter is not currently used for a runtime free-space gate. -
Use the experimental deletion procedure only when you actually intend to delete the current local backup. Deleting the entire device backup directory also deletes unpacked results inside it. Independent copies at other locations must be managed separately.
Failure branches
Section titled “Failure branches”| Symptom | Next action |
|---|---|
| Removal/restoration reports busy or changing state | Wait for the operation to finish, then reload the list; do not edit live configuration files to bypass checks |
| Disk space did not increase after removal | That is expected because removal preserves backups; it is not storage cleanup |
| A backup starts after re-adding the device | Check the preserved automatic switch and schedule. Disable future jobs using Automatic backup and wait for the current job to end |
| Path check passes but saving fails | Confirm it is within the configured backup root and read the error; do not paste a host path into a container-path field |
| Older backup seems missing after a path change | Stop changing paths and check the old directory and independent copies; saving settings does not migrate data |
| Permission or read-only error | Check the host mount directory and write permissions without broadening unrelated permissions |
Next steps
Section titled “Next steps”Regularly back up the instance and rehearse its recovery, and review volumes and capacity again before upgrading. Device-backup recoverability needs independent validation; removing or re-adding a device, or completing a backup job does not replace a restore rehearsal.